The subtitle to this post should be “The Laziness Edition”. Because despite the fact that I sweated and groaned throughout this ottoman reulphostering, I did not have to break out my sewing machine. And that spared me at least a few hours of stitch-ripping and self-deprecating narrative.
I used my good friends, Staple Gun and Elbow Grease. And I think the final product is pretty darn snazzy.

The “before” picture of this ottoman ain’t pretty. It was purchased about seven years ago from a fairly decent furniture store. This means that we paid far more for it than we would now – mostly because we have children. When we bought this piece, we were ensured by the staff that it was genuine leather.
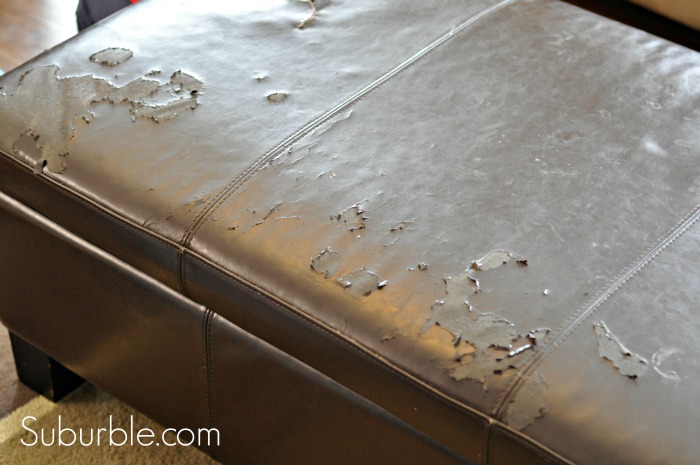
Genuine BONDED leather. Sigh.

The leather peeled up from its backing in a horrendously ugly fashion. It looked like my ottoman had a very contagious and incurable skin disease. (Quick Suburble tip here: we’re pretty sure that it was the use of baby wipes on the surface that destroyed the leather. Don’t wipe things off of your leather surfaces with baby wipes. Heed my warning!)
Mr. Suburble could barely stand the sight of our peeling and horrifying ottoman – and this became especially apparent when we had guests over. “Can’t we just get rid of it? Can you go out and buy a new one…. like… before dinner tonight?”
No! I can’t! My inner hoarder won’t let me throw away an ottoman that we paid hundreds upon hundreds of dollars for. The frame was sturdy, the closing mechanism still working – it was storage, for pete’s sake! In a house with no storage!
So I decided to save my ottoman. I was going to make him beautiful.
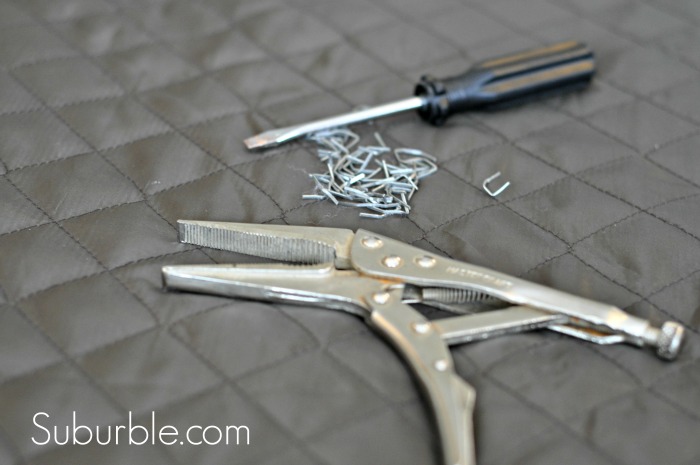
I gathered my tools. Using pliers and a flat-headed screwdriver, I plucked out all of the staples from the lining of the ottoman. It was perfectly good – no reason not to save it.
Lazy Ottoman Recovering Tip #1: If there is hardware attached to the lining, do not remove it.
Instead, leave it as a guide for re-attaching the lining later. Just remove the staples that are at the edges of the lining, and then move it to the side (or gather it in the middle of the frame) when you attach the new fabric.
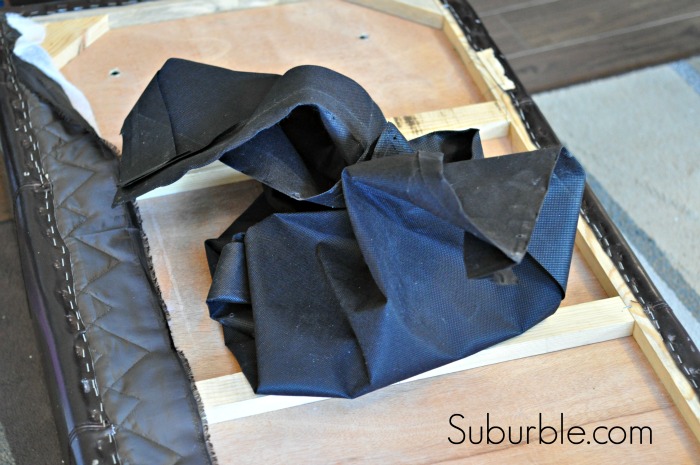
On the bottom of the ottoman, there were two staples that attached the liner to the middle of the box. I left those attached as well, so that I didn’t have to guess where the liner should be placed over the new fabric. Instead, I just bundled it up in the middle of the box and got to work on the leather.
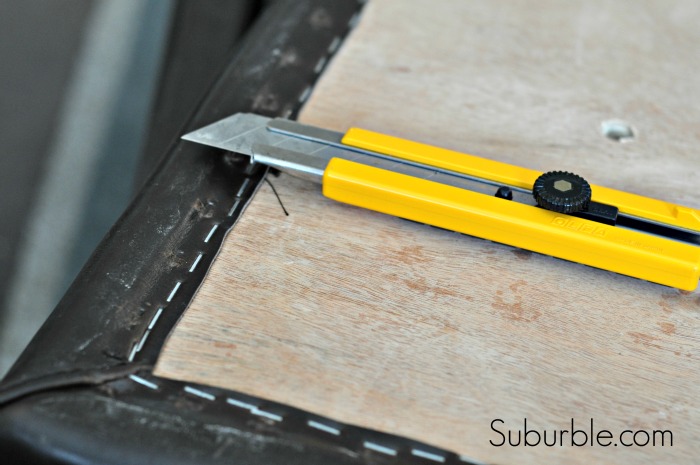
Using my handy-dandy scary-sharp box cutter, I cut off all of the leather from the ottoman. It was very daunting making the first cut. There was no going back now.
This was the part where I started to panic a bit. And I also regretted doing this by myself in the middle of the day with only my children as my encouragement. They mostly tried to play dolls within a three foot radius of me, or they asked incessant questions, “Why are you cutting the ottoman, mommy?” “Ohh… are you doing to tell Daddy that you did that?” “That’s really ugly NOW…”
Remember how I mentioned that I have children and that their baby wipes managed to destroy my ottoman? And did you know that overall, children are pretty messy – quite possibly the slobbiest of all – humans? Well yeah… I must have had some sort of failure in common sense when I was standing in the aisles of fabric in Joann (with my children running around me like wild jungle cats, I’ll have you know) – because I grabbed a bolt of cream coloured fabric and confidently headed to the cutting table.
Screw it. I like this fabric. I can’t deny myself this simply because I procreated.
Stupidity: I have it sometimes.
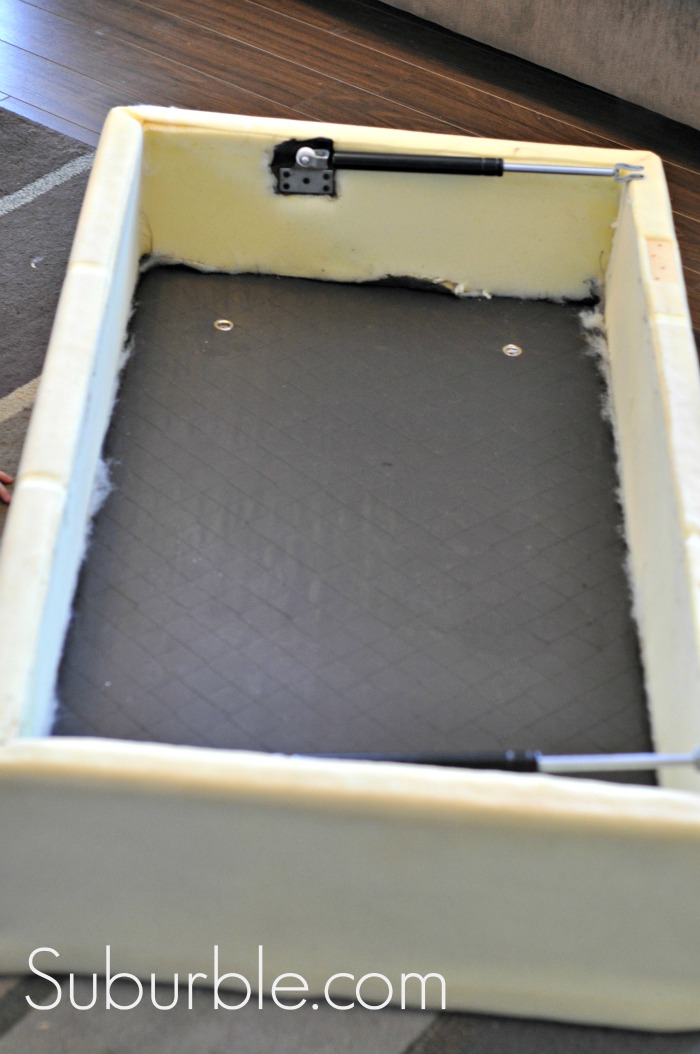
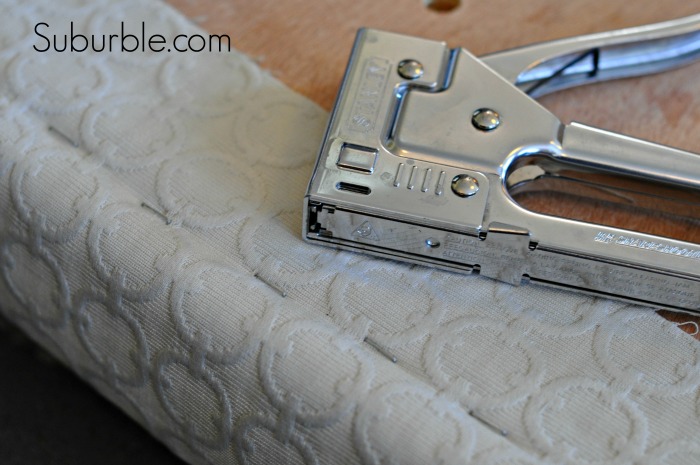
Anyways… I saved the foam from the frame of my ottoman so I just had to stretch the fabric over the lid and body and staple it down. Using a fabric with a pattern was helpful in this case, as I could use it as a guideline for stretching and stapling.
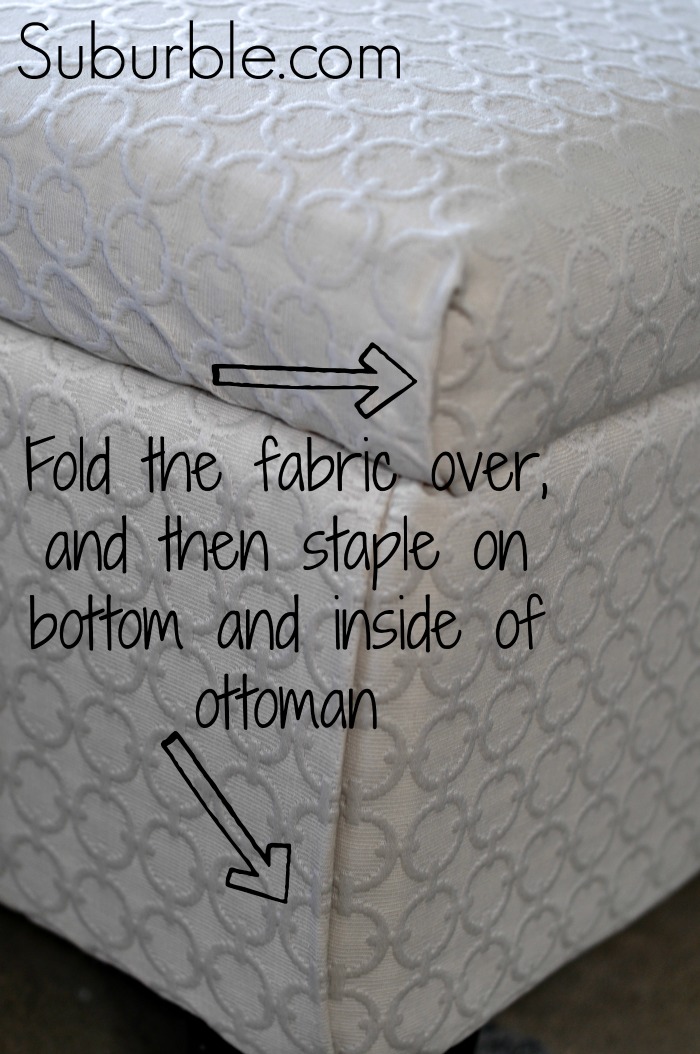
Lazy Ottoman Recovering Tip #2: Don’t sew the seams.
The original leather on the ottoman was stitched on the corners. And that looked nice. But it didn’t look easy – and this mama likes the easy way to do stuff.
So, I created my “no-sew ulphostery corner”. I cut the fabric into lengths that were about six inches longer than the fabric frame. Then, I folded the fabric onto itself and stapled it into the frame. Honestly, it took about a minute to do, and the end product looks pretty tidy! I deftly avoided a “sobbing over the sewing machine” moment!
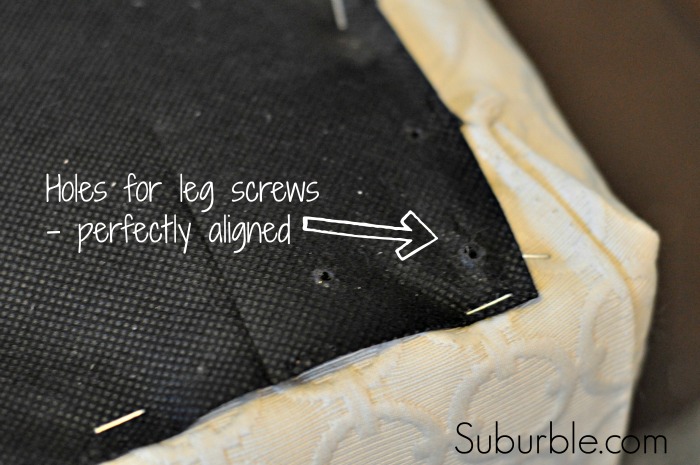
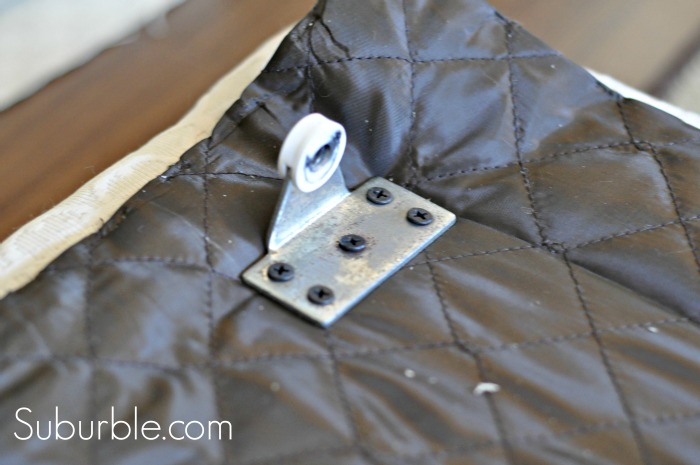
Lazy Ottoman Recovering Tip #3: Use the holes in the liner as your guide.
Once the fabric had been stapled to the frame, I then un-crumpled the liner (which was still attached to the frame in its center) and aligned it to where it should be. This was VERY helpful, as the liner already had holes for the ottoman legs, hinges, and closing mechanism for the lid. My new fabric didn’t do a good job of showing where those holes were (of course, as it covered all of the pre-drilled holes), so the liner was my guideline. I simply had to screw everything back into where the liner told me to, and it was a cinch!
(Granted, by now I was a sweating mess – having wrestled fabric over a hulking ottoman while two children practically pressed their faces against mine: “What are you doing, Mommy? Why? Whyyyyy…..?”)

The liner also helps to make the upholstering job look more professional. It adds a finished look to the piece.
(Do you see the legs of a LaLaLoopsy in this picture? Look closely… CinderSlippers’ glass shoe is hiding somewhere! Told you they were playing dolls practically on top of my project.)

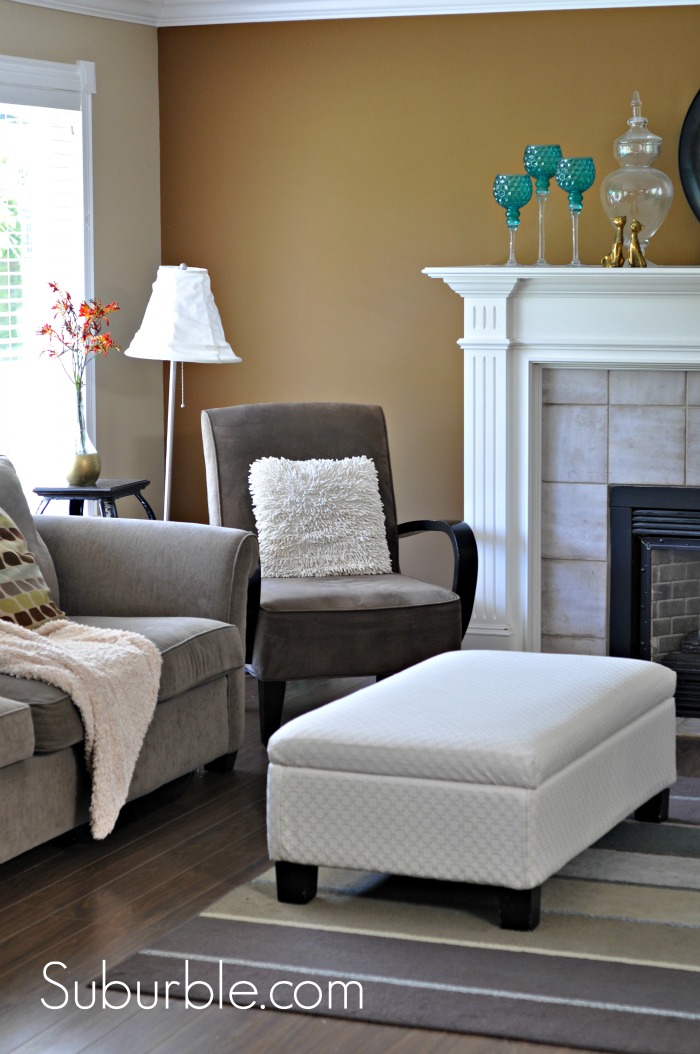
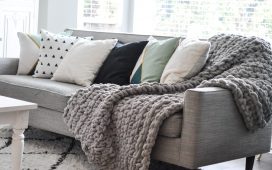
In its completed glory: my gorgeous cream-coloured fabric ottoman. No longer contagious with some sort of rashy leather-virus.
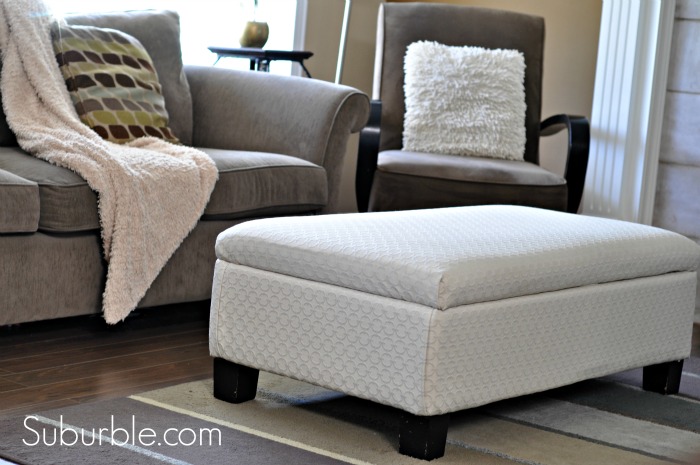
I think that it looks quite nice – and the lighter colour really does brighten up the room. I have always gravitated towards darker, autumn colours, but suddenly, I’m loving my flashy little ottoman and its “look at me” fabric!

And for you parents who are tsk-tsking me and saying, “Lady, you are going to regret that fabric when some sticky-handed monster leaves marks all over that ottoman. You will cry. Like… ugly cry…”, I say, Yeah. I will probably be disappointed. But, I bought the fabric on super-duper sale (in total, I paid $34 for all of the fabric), and I’ve learned how to reupholster this ottoman in a no-sew lazy way. If it’s destroyed, I can fix it. If I hate the colour one day, I can change it.
And when we have play dates at our house, I put a towel over it. I’m not kidding. I don’t take unnecessary risks.
If there is an ottoman who has been aching for a bit of a makeover in your house, I encourage you to try my Lazy Reulpholstering trick. If I can do it with two preschoolers as “helpers”, then you can most definitely do it!
Check some of the other makeovers that I’ve tackled:
Creating a Blue Patina on a Metal Bench


Using Plaster Paint to Antique a Bed
Don’t Miss Another Suburble Upcycle! We love to save junk around here!
Subscribe!


155 comments
Lauren @ The Thinking Closet
Wow, Tara! You are amazing. Upholstering really intimidates me, but you break it down in such a way that even I feel like I could tackle this. And I think it’s great that you chose a fabric you really loved…despite the fact it might get dirty. That’s what spot cleaner is for…AND like you said, you’re a pro at this method now, so you can always change it up down the road. Well done, girl.
Tara
Thank you so much, Lauren! I need more people to tell me that the colour is worth the occasional “covering-up with a towel” move. Most moms are pretty understanding, I have to say. Nobody wants to be responsible for me ripping off all of this fabric and starting again! (Though I will… It’s not as hard as I thought it was going to be!)
Sumer B Holt
I got the EXACT SAME ottoman years ago and ours had the same issue! I had a laugh when I read this and saw the pictures. I’m excited to try reupholstering this myself with your instructions. Thanks!
krystal
I am soo doing this! What was name of fabric? Im in love with it!
Laurie
How many yards did you use?
Shari
It looks great Tara! I bet you are a happy girl knocking that one off the list hey?
Tara
Thank you, Shari! Yes – it feels great to finally have the ottoman re-covered. I let that scabby peeling mess exist for a pretty long time… I don’t know why I waited so long!
Jenny
Wonderfully inspiring……you can buy spray 3M scotch guard and give it some extra protection, makes me think I might consider tackling this project
Tara
I’m so glad that this was inspiring to you, Jenny (despite my moaning and groaning throughout the post). Please let me know if you try this! I’d be thrilled to see pictures!
Anne@DesignDreams
Your ottoman looks perfectly lovely, and if worst comes to worst you can always paint it!! No need to wrestle with dolls, kids, fabric, staples, etc. Just a simple paint job and you’re done.
You are one very patient mommy. Good for you xox
Tara
Anne – that is such a practical idea. I didn’t even consider painting it before. Tell me, if I paint this fabric (eventually), will it crack?
Anne@DesignDreams
Apparently not. I personally haven’t tried painting upholstered furniture but so many bloggers have and say it just feels a little more stiff than the original fabric. Can’t see why it would crack. Then again, it’s such a small piece that if the painting doesn’t work, then you do the reupholstering! Easy peasy – well sort of… 🙂
Tara
This is a VERY cool revelation. I’m going to be keeping this in mind as I peruse garage sales and thrift shops. Potential abounds! 🙂
Amy of while wearing heels
Tara you make me laugh. I love that you’ll throw a towel over your ottoman during play dates :). That fabric is GORGEOUS. Stunning. Amazing transformation. Love it!
Tara
I totally throw a towel over it during play dates. It has a towel on it right now. I know… it’s crazy. But I love the fabric, too. I just wanted it, so I bought it (in a fit of “Let’s pretend that we don’t have children!”). I even had my children in tow with me when I bought it…
The heart wants what it wants. 🙂
Mel
If you have them you have to live with them, screw it, it looks great and well if they ruin it you can always do it again. Nice one xo
Tara
That’s what I say – I can always just re-do it. And if I chose every piece of furniture according to the potential of destruction that my kids could inflict on it, then I’d end up with plastic couches. 😉
Danni@SiloHillFarm
Denial due to procreation…..LMBO!!! Glad you didn’t deny yourself that fabric because it is gorgeous! Nice job and no sew is always my first option!
Tara
Thank you Danni – I really loved the fabric too. I hope that it lasts a year. That’s my ulimate goal (plus, I can only see myself recovering this hulking beast of an ottoman once a year).
Kenz @ Interiors by Kenz
It looks SO good. But here’s the main reason I know we are friends: that fabric. We have the same tastes. That is the EXACT upholstery I used when I did my Lack-Hack ottomans. 🙂 And we’re both inner hoarders.
Tara
Shut up. Really? You used that exact fabric? Crazy kismet, no?
I can’t ever quiet my inner-hoarder. She is quite the force. I often have to duct-tape her mouth shut when we go garage-sale-ing. It keeps me from being on A&E. 😉
Brandy @ The Prudent Homemaker
You’re really funny! I am new to your blog and I may have to read more of your posts just to smile and laugh! I love that you posted your children’s incessant questions.
Tara
They’re incessant, all right, especially if I’m doing something as interesting as sweating all over an ottoman. I’m so glad to gain you as a reader! I’ll definitely return the favour and visit your space in the interwebs! 🙂
Marilyn
SHUT THE FRONT DOOR! Tara, this project turned out AH-MAZING! I LOVE the fabric. WOW, that’s about all I can say…just WOW!
Tara
Thank you so much, Marilyn! It was work the sweat and grunting (and swearing inside my head).
I, too, love the fabric. Which is why there is a towel over it right. this. very. second. 😉
Kelly @ A Swell Place to Dwell
oh my goodness! it’s 1000 times better! Amazing. Just goes to show you that it’s the bones that matter…everything else can be fixed. And I love that you went with the fabric you love….messy hands be gone!
Tara
Isn’t it almost unrecognizable? It’s amazing what a bit of fabric can do!
I am really happy that I went with fabric that I love. Of course, I have moments of dread when the kids have dirty hands or when we’re eating a messy appy in the living room. But the thing is, I don’t want to live in a land of plastic and berber carpet all of the time… It’s so hard to strike the balance!
Kelly @ A Swell Place to Dwell
haha, I’d probably pull out the red checked plastic picnic table cloth if we ate on that beautiful fabric!!!
ChiWei
I admit, that was my first reaction – uhoh white? But whatever, I have a white sofa, so yeah, I’m not one to talk. I do put blankets over it and I’m too lazy to pin it down. I use blankets and an old sheet because we never have guests anyways :-). Your project looks super professional! Use the towels but definitely show it off when people come over!
Tara
You have a white sofa!?!? Love it.
I do make use of the towel-trick – that’s for sure. I think that the biggest challenge was re-training the girls not to use the ottoman as a snack table of sorts. Because it was originally a giant hunk of junk, I didn’t care. Now that it’s cream and beautiful, I had to spend at least a week hollering, “Don’t touch the ottoman!” while they stared at me, shocked.
It is nice to “unveil” it when guests come over, though. I feel like I have a grown-up space. It’s awesome (and weird).
Marilyn
I love this project even more now that I saw this again!
Tara
Oh, thank you so much, Marilyn! 🙂
Shauna @ Satori Design for Living
Love the new fabric choice! We have a similar ottoman that I’ve wanted to cover for some time. It has held up well, but I’m tired of the chocolate brown (I think ours actually is leather though). Now I just need to find the perfect fabric.
Tara
I’m glad that yours has held up well! I was appalled at how quickly our ottoman disintegrated before our eyes! I agree – the fabric choice was a tough one. I considered a bold print, but the ottoman is pretty big – I didn’t know exactly how it would look. Plus, having my children by my side in the fabric store rushed everything. Hence – cream coloured fabric! 🙂
Krista @ the happy housie
So awesome Tara!! I love it- what an amazing job you did on that…. it is sweaty work though isn’t it:) Well worth it!
Tara
You are so right, Krista – it was sweaty work. Hauling that frame over here and there and trying to deal with incessant questions…. it was definitely a workout! 🙂
Melanie
Lovely job!
Tara
Thank you so much, Melanie! 🙂
Bronwyn MayB
Wow! I love it. You did such a good job. Also, I laughed out loud reading your comments. I cannot wait to try this at home. I have a bench to recover!
Tara
Oh Bronwyn, I’m glad that you got a chuckle from the tutorial!
If you do recover that bench, let me know! I’d love to see pictures!
Terri
Stunningly beautiful. wish i was crafty
Tara
Terri – But you are! You just don’t know it yet.
When I started taking apart this ottoman, I was sweating bullets. Partly because I was wrestling a giant wood box around the living room, and also partly because I had no idea what I was doing. I think that creativity lurks inside of all of us. You’d be surprised what you could create if you started a project! 🙂
Bethany
Wow! You did an amazing job!
Tara
Thank you so much, Bethany! I was strutting around – pretty proud of myself – for a while after finishing this project!
Cynthia @ A Button Tufted Life…
I can’t even count how many pieces we have recovered for ourselves and others over the years… I love that feeling you get when you give a tired piece new life!! Bravo!
Tara
Thank you so much, Cynthia! I may have found a new addiction – reupholstery! 🙂
Sheila @sZinteriors
WOW! I love what you’ve done with your ottoman. The fabric is FAB, and I’m so with you – it’s easy to cover up when necessary. That’s not such a tough thing to do. But to opt out on great fabric, or live with the peeling ‘leather’ is like living in a constant state of half in, half out – kind of like leaving the plastic wrap on lamp shades. Why do that? Good for you!!!
Tara
Sheila – Thank you so much for the vote of confidence! I don’t want to be the lady who leaves the plastic on her lampshades!
I’ll just be the lady that covers her lamps in towels when children come nearby! 🙂
Thank you very much for your compliments! It means so much coming from a stylish gal like yourself! 🙂
Inspire Me Heather
Nice job on your ottoman, it turned out beautiful and I love that fabric – gorgeous!!
Tara
Thank you so much, Heather! I love the fabric too! (Well, that fact is pretty obvious as I chose it even though I’m risking its demise with every sticky-fingered child who walks into the room!)
Karen@NourishWithKaren
I love this! Thanks for the lesson, I am pinning it for future finds!
Tara
Thank you so much for the pin, Karen (I looooove pins!). Let me know if you tackle your own project!
Heather
Great tips – I love the fabric you chose! Great job on the makeover!
Tara
Thank you so much, Heather! It was a bit of a sweaty job, but I love how it turned out! 🙂
Dani @ lifeovereasy
Wow – it looks great! And I love the attitude about the colour of the fabric. You can’t always worry about child-proofing – sometimes you just have to go for it!
Tara
You’re so right, Dani! You can’t always get hung up on the child-proofing part of your life (especially when it’s just fabric, it’s not tumbling down two flights of stairs or something). Sometimes I shake my head at myself though – there are many other things – dents in walls, knicks in my table legs, stains on clothes and accent pillows – that have been collateral damage to the Child Raising Experiment in our house. I circle over my ottoman like a hawk these days! 😉
Jen
Almost makes me want to go buy a nasty storage ottoman from a yard sale so I can recover it. It looks great!
Tara
Do it! And then send me pictures!
kathy
I have a large leather sectional that is doing that exact thing and looks horrible. I wish the fix was as easy for that! Any suggestions? Your ottoman looks great.
Tara
Oh man… a sectional is going to involve SOME sewing. It is a boxy shape? Or is it more complicated than that?
One thing that might work in the meanwhile are some incredible throw pillows with lots of great colours and patterns. If you can’t reupholster the couch, you can distract people with your style!
Mary
Someone else probably said this but if that gorgeous ottoman was in my house with kids, I’d head back to the fabric store for some muslin (or to the hardware store for a new canvas drop cloth) and cut a generous rectangle to plop over. I might even sew a simple slipcover for it.
It can easily be taken off and stored inside for grownup nights.
I think it’s great you chose the color you love. The kids can learn to be neater (and they will). Meanwhile the worst that can happen, is that you’ll recover it again some time in the future.
You did great!!
Tara
That’s a great idea, Mary. Right now, my ottoman is wearing a big gray beach towel. I can’t take risks with sticky fingers. I like the idea of a muslin covering, though. That might be a teensy bit more attractive than a terry cloth towel!
You’re so right – I will inevitably recover it again, but I’m glad that I stayed true to my taste and picked the lighter fabric. It was a risk, but it was worth it!
Dineen
Your first re-upholstery job looks great. You were so smart to keep the lining. That’s something that I would have thrown away and then decided to pull out of the trash after realizing my mistake. The cream color fabric looks great in your room. Scotchguard fabric protector can go a long way to keep it looking nice. (Even from grown-up wear and tear.)
Tara
I’ve definitely been considering Scotchguard (though we did have a little “salsa incident” – by a grown-up, no less – that cleaned up well on the fabric! Thank goodness!) – as it’s inevitable that someone will get something on it.
I’m glad that I left the lining on – it made my project that much easier. And yes, I had a moment of, “Should I just chuck this?”
It was just dumb luck that I realized at that moment that I could use it as a template for all of the legs/hinges, etc!
Jen
FABULOUS! I can’t stop looking at the before and after. Great job 🙂 We have an ottoman that doesn’t match our new furniture; thanks to your post, I am thinking about changing it up!
Tara
Thank you so much, Jen! You should give it a go – honestly, it’s not that difficult. It’s just a bit of manual labour! 🙂
Please let me know if you decide to tackle your reupholstery project – I’d love to see pictures!
Maria
I will try it, no doubt!! Yours is gorgeous!!
Tara
Maria – Let me know if you do! I’d love to hear about it (or even see pictures!)
Cassandra Donges
How much fabric did you use ? I have no clue how much fabric to get .
Tara
Cassandra – I used 3 yards of fabric. My ottoman is a larger one, about 4 feet long. I’d say err on the side of caution and more rather than less. (If you have leftovers, you can always make a couple of coordinating accent pillows!)
Caroline
Hi Tara, your ottoman looks amazing. I think I may do the same with ours. So you know who makes your fabric and the name and color of the fabric. It is beautiful.
Erin
Thank you so much for this post. I stumbled upon it with a Google search and it was exactly what I was looking for. We used your instructions and recovered our ottoman. It looks amazing. We also replaced the wooden block legs with casters. Now it is so easy to move around to vacuum!
Tara
Erin – thank YOU for leaving a comment and sharing your success story! Do you have any pictures? I’d love to see them.
Casters are a brilliant idea! I know that I’m constantly dragging my ottoman around to vacuum – or let’s face it, sometimes I just shrug and say, “Welll… looks like that part isn’t seeing a vacuum today!”
Sara
Thanks from me too. I successfully covered my ottoman yesterday based on your instructions, and am so pleased with the result. The only extra tip I used (from my Mum who knows about these things) was to put a cover of calico under the fabric to give it a firmer base. It worked really well, especially when going from leather to fabric.
HarLee Jaye
I had an ottoman that did the exact same thing…never used a wipe on it. If it was the wipes they’d do similar to baby bums. I’d spray it with a few coats of ScotchGuard, too, then NOT worry. A home where kids can’t be kids is just a house. For those who think Upholstery is difficult, it isn’t…IF U can wrap decent Christmas or birthday presents, U absolutely CAN upholster! A trick I’ve learned, in the land of smart phones, is take step-by-step pix as U break pieces down, so you can see them, in reverse, IF U need to when putting back together. Now U have me wanting to upholster something…LOL! Nice job.
Tara
That’s a great way of thinking about it, HarLee: “If you can wrap a decent present, you can re-upholster”. That would surely boost peoples’ confidence!
And I love that trick of taking photos step-by-step in order to put it back together! Genius!
HarLee Jenkins
Thanks much! If in doubt, find a free/cheap ottoman somewhere and go buy some fabric @ a big box store, 99cents/yd and ” go for it” as practice. We learn from doing. I probably wouldn’t choose a complicated sofa with huge pillows as my first, but it really is like wrapping presents. There are different type corners for different pieces. Who knows, you might just design a new upholstery “style”…and become famous/rich!
Tara
HarLee – I need to keep you around – you’re full of fabulous ideas! I love the idea of practicing upholstery on cheap/thrifted pieces. And if I can design a new style and become rich and famous, well then… I’ll take it!
MCN
Hi Tara! Thank you for the tip! I will be trying this on two mini-ottomans this weekend with my 2 year old and 11 month old as my “helpers”. I will probably have wine chilling for afterwards, just in case! This is so easy to follow and I am super excited to try it!
Tara
Oh, I’m so excited for you! You can do it!
If you get the chance (and once you’ve poured yourself a celebratory glass of wine), please snap a picture and send it my way! I’d love to see how they turned out!
MCN
Hi Tara! Will do! Going to buy fabric tomorrow, so am pretty excited about my weekend project!! Thanks again for the steps and tips! (I will most likely be pouring the wine either way! lol)
Bernadette
This is super great!! I have a storage ottoman as well. While there is nothing wrong with the fabric, the color totally does not go with everything else. I also have young children. I also will be using a cream color!!!
Thanks for this DIY. I will do it myself 😀 (especially after I was quoted $450 to have it reupholstered professionally!)
Tara
Go for it, Bernadette!
I got brave and took the towels off of the ottoman, and you know what?!? It actually cleans up really well! (And the most glops and gloops of stuff that have fallen onto it have been from men, not children – go figure!)
Let me know if you need any help. I’d love to see the finished project!
And that cream fabric is still at Joann right now (if that’s the look you want). Such a great price! (And $450 for new upholstery?!?!? Gah!)
Bernadette
Tara
Do you remember how much fabric (by yard) you needed to reupholster this?
Bernadette
Tara
Yep. I bought 3 yards and it was *just* enough. I’d maybe get 3 and a half yards… just for the whoopsie-factor.
lovelyduckie
We also fell prey to accidentally buying bonded leather, it was our first couch (reclining too). We ended up just sending it to the dump after a few years, it was SO AWFUL that no one would even take it for free on Craigslist. I wasn’t ambitious enough to challenge re-upholstering it, especially since the mechanics of it were never quite right and it didn’t fit the space. Well lets just say we learned a valuable lesson…enough on that 🙂
We bought a nice little faux leather ottoman (ironically much sturdier than bonded leather) but when my 2nd dog was a puppy he chewed it up at the corners, I did a half decent patch job with some fabric I found and he chewed it again. I’m going to be doing exactly what you did with my ottoman as well. My material choice is brown denim, I’m hoping the denim will easily stretch over the foam. I’m going dark because my couch is a bright green (sivik green from ikea) and I recently bought a bright blue rug to go with it. I’m going to use the ottoman to better pull in the dark brown side tables and curtains.
So anyway, thank you for this post.
Tara
Oh, let me know how it turns out! It really isn’t half as hard as it seems.
And yes, bonded leather is such a horrible “fabric”. I can’t believe I lived as long as I did with that peeling atrocity!
Candice
Just a thought. Have you thought about using Velcro instead of staples for the same effect but make more than one cover and that way you can always have one in the wash and one on the ottoman so it’s easy clean when grubby little hands touch it or something spills on it. If you had cover slips you could have different colors to suit your mood fabrics even leather or vinyl if you want it spill resistant for a purpose. Wouldn’t have to worry about stains or rips. Just put on a different slip.
Crystal @ Sew Creative
Ok. I think I need to invite you over for a DIY night so that you can help me refinish my ottoman. This turned out so pretty! I love it. Pinning it and adding it to my list of home renovations.
Congrats for being featured on Cityline!
~Crystal
Tara
Thank you so much, Crystal! You let me know if you ever want to DIY together – how fun would that be?
jenna
love this idea! can you tell me the color of wall color – the fireplace wall? Love it! I need to redo our main foyer area 🙂
Julia Avery
THANK YOU. Made it look easy and I am going to give it a go.
Tara
Julia – let me know how it turns out! And feel free to email if you have any questions!
Cristina
Genius!! Pure GENIUS!!! You are amazing! It looks gorgeous!
Tara
Lady, you make me feel like I should be upholstering more things… If you’ve got a project, let me know how it goes. You’d be amazed at how easy it is!
https://aviso.zendesk.com/entries/27483235-
付けっぱなしで寝たり、乾いててゴロゴロだけど付け続けたりして
みるきーがたまに黒コンつけてるけどあれはやめた方がいいな
ベンジャミン・フルフォード、副島隆彦、リチャード・コシミズ ユダヤの陰謀です。
Cynthia
Love the ottoman! Found your blog while I was researching how to do an easy upholstering job on a crazy DIY project I’ve got going on — taking 3 milk crates, padding, plywood, six furniture legs and fabric and making a 3 compartment covered laundry bench for the end of my bed.
My question is a dumb one: can you detail how you did those corners for a doofus? I get the fold, but did you staple it to the top and bottom of the ottoman?
And I’m wondering if hot glue will work because I’m not sure how well staples will do in plastic.
Thanks for the inspiration!
Tara
Cynthia, I don’t think you sound like a doofus at all! You sound like a genius!
Yes, I stapled inside of the ottoman (it’s a storage ottoman) and on its bottom. Are you trying to do the same thing – have a top that opens and you can see your three milk crates inside? I might suggest putting wood in the corners of your crates (even 2X2 pieces?) and zap-strapping them in place? These are the plastic milk crates, right? You could feed the zap-straps (or zip ties, I think they’re also called?) through the holes in the carton and secure the wood. Then, staple the fabric to your wooden corners!
If that’s not going to work, you can always send pictures of what you’re working with. I love brainstorming! 🙂
Cynthia
Yep, that’s the idea … And the zip ties are a fab idea!
If it works, I’ll try to send a pix!
Brandi Marie
Oh thank goodness!
I just moved into my first apartment and 98% of all my stuff is hand-me-downs including my beloved love seat with matching ottoman… that I need to reupholster. I bought a cover from Target for the love seat but I’m staring at this gosh awful ottoman seriously thinking of throwing it off my balcony… neighbors probably won’t appreciate it but BAM… here is your blog post to save the day!
*cracks knuckles and then neck*
I can do this! I just have to get some cut fabric… and I can do this!
Tara
Brandi – You know what I’m going to say – Pictures, lady! Pictures! Capture your epic DIY adventure – you’ll be amazed at your reupholstering prowess… (And send me one or two of those pics, I’d love to feature them!). Good luck, girl. You’ll be great!
Julie @White Lights on Wednesday
This.is.AWESOME! Our ottoman/shoe catcher has a hole in the leather and it’s peeling. It’s becoming an eyesore, and I don’t want to give it up. It needs a new hinge too. 🙁 I’m so inspired to recover that bad boy and keep it forever!
Tara
Julie – do you have photos? I want to see your before/after. It’s amazing what a difference a bit of fabric can make!
Roxann
I thought I was the only one who had the ottoman and in my case sofa with the leather skin disease. Thanks for showing the Diy cover for it. Now I have Hope
Tara
I’m so glad you have hope, Roxann! It’s really not as hard as it seems! I hope that your leather-skin-diseased ottoman finds a new life!
Samantha
Thank you so much for your tutorial! My ottoman was too large to feasibly purchase a slipcover and was looking horrendous! I took your advice and it looks great! If only I could figure out how to post a picture. Thanks for your blog!
Tara
Samantha, could you send me a picture? (suburbleblog@gmail.com)
I would LOVE to share it on my Facebook page. “After” pictures give people huge boosts of encouragement and DIY prowess. If you’re willing, I’d love to show off your handiwork!
That aside, I’m so glad that you found the tutorial helpful! These hulking ottomans need new lives breathed into them – you’re right, a slipcover just doesn’t cut it.
Nancy
I know this is an older post, but I love what you did. I’m getting ready to do the same thing to a backless loveseat covered in bonded leather. Let me tell you, if your kids won’t destroy your bonded leather, your cats WILL. Even though we have plenty of scratching posts in the house, this little loveseat is where my cat does ALL her scratching. It looks so horrible, my husband wants to get rid of it or at least hide it in the garage. But it’s otherwise sturdy and a nice piece and I have just the fabric to use. I am inspired by your project and hope to start mine this weekend.
Wish me luck. 😀
Audrey DeJongh
Its such a wonderful project, looks stunning. You have inspired me, to fetch my ottoman from the garage, yes 10 years been sitting with old stained and now torn cover, had no idea where to start ottoman. It has quite nice curled legs in wood, so tried to figure out how to get the top layer and piping off, before adding the new fabric. Thanks for this. I WANT TO ASK – What did your huwband say of your creation.
debbi s.
I love that fabric. A spray over with Scotchguard Fabric Protector should help with grimy fingers and occasional spills, too. A little nailhead trim at the top edge would amp up the zing, too. Very nice work.
Tara
I love the idea of the nailhead trim! Thanks so much, Debbi!
Daniella
Hello Tara
Great article! Have just put my leather one on Ebay and am now considering whipping it off and giving this a try instead. Do you think I could be even more lazy and just leave the leather on and place the fabric over it? Thanks Daniella
Tara
Oh, you could definitely give that a try, Daniella! I’d just make sure that your fabric is thick enough to disguise any imperfections or seams in the leather underneath.
Alicia
I am recovering my upholstered ottoman, (my cat thought it was a great place to sharpen her claws over the years..) The issue I’m running into with no-sew is the inside, there is a liner, which is also sewn to the exterior fabric. What did you do with the inside, hopefully you have pics somewhere or some easy to follow advice, I love the no-sew option, as I hand sew everything, I have no sewing machine skills!
Tara
Oh, Alicia – I’m sorry I missed this. I’m wondering if you could cut the liner where it meets the upholstery fabric, and then staple it down into the interior of the ottoman? You could fold the fabric over to get a nice “hem” and then staple it down on top of the liner? Does that make sense? Let me know if you want to brainstorm.
Lin
I enjoyed reading your lazy guide to reupholstering. Especially your no sew approach. It made me laugh a couple of times.
I was searching for guides as I have THE most comfortable armchair that swivels and leans back…and its an ugly brown. I will not part with this chair as I spent countless comfortable hours in it nursing my baby. I am determined to make it a pretty color. I’m considering using a cotton sheet set or a cotton blanket as my fabric. Either a cover or actual upholster. Hmm..
Anyway thanks a bunch for the fun and funny read with great pictures!
Emily
I love this idea! I am going to try it. i’m a little confused on how to do the bottom part. did you wrap the whole bottom like you did the top part and just fold the fabric in the inside to staple? or just wrap the fabric around like a skirt type thing then staple both inside the top and along the bottom? or use two pieces of fabric, one for the horizontal pieces and one for the vertical? (I’m thinking this is what you did when you mentioned 6 extra inches ) hope this makes sense to you.i am not very crafty but my “leather” ottoman lost its battle with our puppy and i hate to throw it out so this is motivating me to attempt it.
Tara
Oh shoot. I think I just replied to this, but maybe the internet ate it up?
I wrapped it around the base like a skirt, as you said, but in four separate pieces (one for each side). And then because each piece was a bit too long, on purpose, I folded it in on itself in order to be a neat little corner.
Does that make sense? Let me know if it doesn’t and I can help! I’d love to see your “after” photo!
RJ
Thank you so very much for sharing your “No Sew Repair” experience. A dear, dear friend, gave me a small, foot, ottoman, with the hinged lid for storage. I love it. But the fabric is absolutely “yucky” as my granddaughter would say. I am currently searching for fabric that has book quotes, words from literature, etc. Thus far I have found the whole ottoman, but not “replacement” fabric So, the search continues. My grandaughter is super excited about “our new project.” Secretly so am I, but for different reasons. 🙂
Again, Thank You for sharing – you did a great job and I love your choice of fabric. And if the day comes this ottoman no longer suits your fancy…for less than fourty dollars you can change it to something that does!
Tara
RJ, I would love to see the finished project that you and your granddaughter tackle! It sounds like it’s going to be lovely in the end!
Joan
Hi, love what you have done , it looks fabulous! I have a very badly stained pillow top ottoman, it’s cream, but I am very bored with the colour, I would love to try the no sewing idea but it doesn’t lift off like yours does, any ideas how I could tackle it? Thanks, Joan
Tara
Joan – just so I have an idea, does this mean that your ottoman is not a storage ottoman, but is just a pillow-top? There is no way to access the inside of the ottoman?
Jamie
I know this is a VERY old post ! But I am ready to embark on this very same project! Bonded Leather!! Ugh!. How did you get the top off!? My hinges seem to be somehow attached to the top! Any suggestions or advice would be soooo apprieciate!
Tara
Hi Jamie – can you open the top of the ottoman so that you can see the hinges? Can you not get them off with a screwdriver? Let me know what you’re looking at and maybe I can help!
Katie
This turned out so good! Thanks for sharing!
Katie
button-jar.com/blog
Tara
Thank you, Katie! I so appreciate that!
Kali
Hello Tara,
I feel inspired by your post on redoing my ottoman (which looked just like yours after I had my son). I’m curious as to what were the dimensions of your ottoman and how much fabric did you purchase? Also, how did you determine how much fabric to purchase? I’m new at this and I think I figured it out, but I need validation. 🙂
My ottoman is 46″-47″ long & 29″-30″ wide. I’m looking to purchase a fabric that is 55″ wide. I was thinking about purchasing 5 yards in total; for the sides I was thinking of cutting the fabric in half to cover the bottom part of the ottoman (my ottoman is pretty similar to yours). What do you think?
The
Tara
Hi Kali! I used three yards in my project, but I think that erring on the side of more is a good idea. Five might be too much, but then again, you’ll have room for mistakes.
Bernie Adley
Hi there colleagues, nice post and pleasant arguments commented here, I am actually enjoying by these.
Sindi
Aaahh I enjoyed this so much! You’ve made it sounds really easy. I am going to try it this weekend. Doubt it will be as neat but it’ll have to do.
Tara
So how did it go, Sindi?!?!? 😉
Terry
Exquisite! Absolutely love the fabric you chose. I never “settled” because I had children. Just tried to teach them to be careful, and said lots of prayers! I found an ottoman that someone was putting into dumpster, and could tell it was sturdy but the fabric was a horrible, dirty mauve (can we say, hello 80’s?). Although this is not a storage ottoman, I believe I can use the same technique to reupholster it. Can’t wait to try it…but since I will be moving soon, will wait until after move. BTW, you might try a couple of products that are great for outdoor cushions: Never Wet by Rustoleum or Thompson’s Water Seal for Fabric. Both protect your fabric without changing texture. Great instructions, and laughs to boot!
Terry
Also meant to tell you that the fabric painting works well, as does dying. Paint does leave a little stiff, but don’t see that would be a problem for an ottoman. Going to be dying my favorite rocking chair after the move, and buying complimentary fabric for the ottoman.
Tara
I love that you didn’t settle either, Terry! The ottoman is still in the family room, all of these years later, wearing its upholstery from that fateful day! Hahahaha! I’ve never heard of Never Wet! I’m going to do some investigating! Thank you!
Eva Skincare
It’s a shame you don’t have a donate button! I’d definitely
donate to this fantastic blog! I guess for now i’ll settle for book-marking and adding your RSS feed to my Google
account. I look forward to fresh updates and will share this blog with my
Facebook group. Chat soon!
Aimee Aimee
This is very simple, but so effective! I love the design and I will definitely make one for myself:) Have a nice day
Embroidery
Rhonda
I have a storage ottoman very similar to this, though a bit larger and with two lids. You’ve made this look really doable! Pinned and will take this on in the near future. Thanks.
Gwen
Hi! I may have overlooked this detail, but how many yards of fabric did it take to cover your ottoman? We have the same bonded leather ottoman and it’s so nice because of the storage, but it looks atrocious because of the peeling material! Thanks!
Tara
I know that I answered this question in the comments before, but I’ll bet I forgot to edit the post! Whoops! I used 3 yards of fabric, but if you’re going out to buy some – buy a little extra. I was feeling pretty nervous at the end of the project because I had *just* enough!
Kristine
Hi there,
I need to do something similar to my tufted leather storage ottoman that my cats destroyed (grr!). Just wondering how you went about measuring the amount of fabric you need to cover your ottoman?
Thank you!
Shari
Wow! You did an awesome job! Inspiring me to get out the staple gun and re-do an old foot stool.
joan brueggemann
I LOVE the idea for recovering the ottoman… BUT I have an OVAL (shredding) ottoman
and so how can I do that ??
joan brueggemann
How can I recover an OVAL ottoman ????
Sara
I was looking on how to re upholster an ottoman since I was having the same dilemma. I was already looking at amazon to replace it, but now that i saw this i can maybe keep it and get another one. How did you determine the amount of fabric……i know its a dumb question but I am not very crafty. You mentioned you just left 6 in. per side? Also is that a regular stapler you use or was it those heavy duty ones? I also really like the fabric.
Heather
This!!!! Thank you SO much for posting this! I think you just saved my marriage as our pleather, well loved ottoman also looked like it had leprosy! My suggestion was to replace it (not so cheap, especially this time of year!) before it drives me bonkers, darling hubby said to just leave it and not spend the money. Along comes a google search and tada! Marriage, sanity and ottoman saved! Can’t wait to buy my fabric and get started! On a side note, if anyone is reading this today, Happy Thanksgiving! And where are the best Black Friday fabric deals??? 😉
TonyaParsons
Wow! You did an awesome job! Inspiring me to get out the staple gun and re-do an old foot stool.
bedding
Thank you for every other informative site. Where else could I get that kind of information written in such a
perfect way? I have a project that I’m simply now running on, and I have been on the glance out for such information.
Eric Paul
I admit, that was my first reaction – uhoh white? But whatever, I have a white sofa, so yeah, I’m not one to talk. I do put blankets over it and I’m too lazy to pin it down. I use blankets and an old sheet because we never have guests anyways :-). Your project looks super professional! Use the towels but definitely show it off when people come over!
EMdigitizer
EMDigitizer has made embroidery services more efficient and productive. In the beginning, digitizing was done manually but with the passage of time, this has now become a digital process.
Absolute Digitizing
Embroidery Digitizing Services | Absolute Digitizing transforms digital designs into precise, stitch-ready patterns. Their expert team ensures each design is meticulously digitized to maintain clarity, detail, and accuracy, resulting in stunning embroidered products. Catering to a wide range of needs, from commercial branding to personal projects, their services are ideal for apparel, caps, and other textile items. Known for reliability and quick turnaround times, Absolute Digitizing is the go-to choice for exceptional embroidery digitizing services.
UK Embroidery Digitizing Company
Digitizer has made embroidery services more efficient and productive. In the beginning, digitizing was done manually but with the passage of time, this has now become a digital process.
Hot Digitizing UK
UK EMBROIDERY DIGITIZING COMPANY Digitizer has made embroidery services more efficient and productive. In the beginning, digitizing was done manually but with the passage of time, this has now become a digital process.
Cre8iveskill
Love this no-sew method for recovering an ottoman! It’s such a creative and easy way to refresh furniture without the hassle of sewing. Thanks for sharing these helpful tips—definitely inspired to try this out!
I Love Digitizing
Embroidery Digitizing Services | I Love Digitizing transforms digital designs into precise, stitch-ready patterns. Their expert team ensures each design is meticulously digitized to maintain clarity, detail, and accuracy, resulting in stunning embroidered products. Catering to a wide range of needs, from commercial branding to personal projects, their services are ideal for apparel, caps, and other textile items. Known for reliability and quick turnaround times, Absolute Digitizing is the go-to choice for exceptional embroidery digitizing services.
Emma Clark
This guide clearly explains a practical approach that CIPD Level 3 Assignment Writers might appreciate when learning simple, creative ways to refresh home furniture without sewing skills step by step.